Resurrecting an HPE ProLiant Microserver Gen10 Plus
Sunday, Dec 29, 2024 · 2746 words · approx 9 mins to readWhile preparing my HPE ProLiant MicroServer Gen10 Plus for sale to its new owner, I thought I’d be helpful and upgrade the various UEFI, remote management and platform firmwares to their latest versions, since I was in the remote management system anyway returning the system back to factory settings.
For some reason which I haven’t quite figured out, a set of platform firmwares for the Gen10 Plus v2, which HPE call the Server Platform Services (SPS) firmwares, were flashed to what HPE call the ME ROM and subsequently the system stopped booting completely. The iLO was available but the rest of the system wouldn’t power on.
You’d think that because the iLO was able to flash the wrong SPS bundle to the ME ROM, it’d be able to flash the right one, but it’s not able to do that unless the system is up and running, again for reasons I haven’t quite figured out.
Despite being a known issue affecting many MicroServer Gen10 Plus owners, caused by HPE, the company’s official response is for users to cough up money for complete replacement mainboards. Thankfully, an incredibly helpful user on HPE’s Community forums posted a remedy with a slightly lower cost.
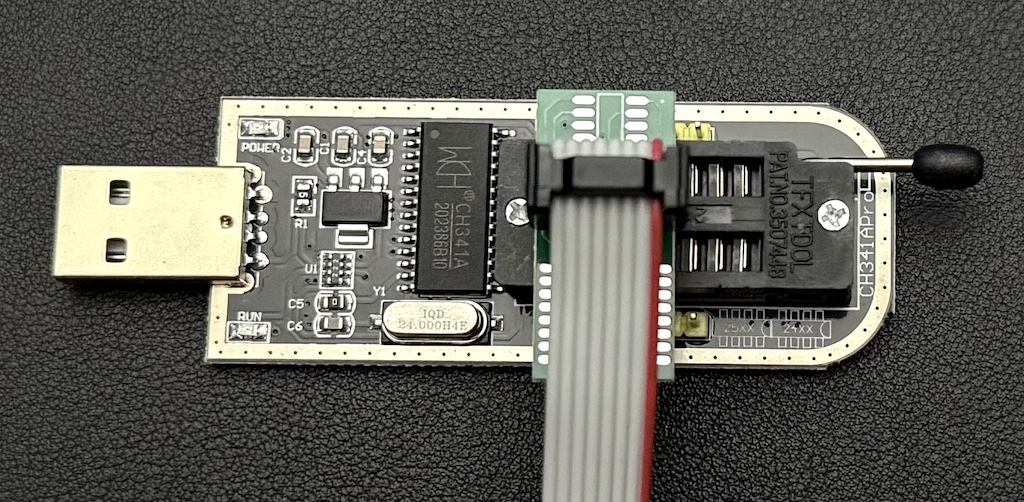
The ME ROM on my particular Gen10 Plus is a Macronix MX25L6473F 8MiB SPI flash chip, in 8-pin SOP form factor, so I bought a cheap CH341A USB programmer from Amazon, including an adapter for the included SOP8 clamp and cable, and set to work.
The first thing to do is disconnect power from the system completely and open it up by taking the top case off. Everything you do from here on in to reflash the ME ROM doesn’t need system power. Then you unscrew the two Torx T15 retaining bolts that let the mainboard tray slide out and pull that out slowly and almost all the way.
There’s some cabling that stops you taking it out completely which you can detach if you want to fully remove the mainboard, but it’s not strictly necessary if you have enough room where you’re working on your own Gen10 Plus system.
Then you need to remove the CPU heatsink (4 more T15s) and then optionally remove the CPU fan (4 more T15s). I removed the fan just to give myself a bit more room to get the clamp seated well on the MX25L6473F, and repasted the CPU for the new owner while I was there since the original thermal material had dried out quite a bit.
Then with the SOP8 clamp on the flash chip and correctly cabled to the CH341A programmer, and that connected to USB in your system, you can dump the current flash (if you want to check out exactly how far the broken flash got, which isn’t far in my case), and then reprogram new flash contents to get the ME ROM going again and bring the system back to life.
I’m a macOS user so I used a small command line utility (also available on Linux and other UNIX-likes) called flashrom, after preparing the new 8MiB firmware. I used another command line tool to do that called bvi (binary Vi), which allowed me to remove the pre- and post-amble around the 8MiB region that I needed, as mentioned in the post on the HPE Community forum. The resulting binary file, which I called extracted_rom.fwpkg, taken from MicroserverGen10PlusSPS_05.01.04.913.fwpkg, has a SHA256 hash of b92532af89a89689a9dc0c9c6a532788368f522f81d6a893d98fd2566e9c7862.
I then flashed it like this:
sudo flashrom --programmer ch341a_spi --chip MX25L6473F --write extracted_rom.fwpkg
And then dumped the ROM back to a file in order to verify it had flashed correctly, like this:
sudo flashrom --programmer ch341a_spi --chip MX25L6473F --read rom_dump.bin
I then made sure the newly dumped rom_dump.bin had the same SHA256 hash as mentioned above, to validate it had flashed correctly, and then powered the server back on from the iLO. It started cleanly and after a couple of reboots (normal after flashing a new UEFI firmware which I had done prior to flashing the bad SPS bundle) it was behaving normally again.
If you’re interested in getting the exact same CH341A programmer and cable bundle that I did, it’s this one. Note that isn’t the cheapest one available, but is cheap enough and worked fine for me.
Here’s a (lightly edited) terminal log so you can see the interaction with the command line tools in more detail. The most interesting thing is flashrom not being able to exactly identify which Macronix flash chip it was (which I just read off the top of the chip manually), and saying it failed to unlock a status register which you can safely ignore.
rys@rocket:~$ sudo flashrom --programmer ch341a_spi
flashrom v1.5.1 on Darwin 24.2.0 (x86_64)
flashrom is free software, get the source code at https://flashrom.org

Found Macronix flash chip "MX25L6405" (8192 kB, SPI) on ch341a_spi.
Found Macronix flash chip "MX25L6405D" (8192 kB, SPI) on ch341a_spi.
Found Macronix flash chip "MX25L6406E/MX25L6408E" (8192 kB, SPI) on ch341a_spi.
Found Macronix flash chip "MX25L6436E/MX25L6445E/MX25L6465E" (8192 kB, SPI) on ch341a_spi.
Found Macronix flash chip "MX25L6473E" (8192 kB, SPI) on ch341a_spi.
Found Macronix flash chip "MX25L6473F" (8192 kB, SPI) on ch341a_spi.
Multiple flash chip definitions match the detected chip(s): "MX25L6405", "MX25L6405D", "MX25L6406E/MX25L6408E", "MX25L6436E/MX25L6445E/MX25L6465E", "MX25L6473E", "MX25L6473F"
Please specify which chip definition to use with the -c <chipname> option.

rys@rocket:~$ sudo flashrom --programmer ch341a_spi --chip MX25L6473F --write extracted_rom.fwpkg
flashrom v1.5.1 on Darwin 24.2.0 (x86_64)
flashrom is free software, get the source code at https://flashrom.org

===
This flash part has status UNTESTED for operations: WP
Cannot read CONFIG: unsupported by chip
Failed to unlock flash status reg with wp support.
Reading old flash chip contents... done.
Updating flash chip contents... Erase/write done from 0 to 7fffff
Verifying flash... VERIFIED.

rys@rocket:~$ sudo flashrom --programmer ch341a_spi --chip MX25L6473F --read rom_dump.bin
flashrom v1.5.1 on Darwin 24.2.0 (x86_64)
flashrom is free software, get the source code at https://flashrom.org

Found Macronix flash chip "MX25L6473F" (8192 kB, SPI) on ch341a_spi.
Reading flash... done.

rys@rocket:~$ ls -lsa
total 81960
    0 drwxr-xr-x@  7 rys   staff      224 29 Dec 22:33 .
    0 drwx------@ 80 rys   staff     2560 28 Dec 22:59 ..
16424 -rw-r--r--@  1 rys   staff  8409026 28 Dec 22:59 MicroserverGen10PlusSPS_05.01.04.913.fwpkg
16384 -rw-r--r--@  1 rys   staff  8388608 28 Dec 23:26 extracted_rom.fwpkg
16384 -rw-r--r--@  1 root  staff  8388608 29 Dec 22:24 rom_dump.bin
rys@rocket:~$ sha256sum rom_dump.bin
b92532af89a89689a9dc0c9c6a532788368f522f81d6a893d98fd2566e9c7862  rom_dump.bin
I didn’t need to install any USB drivers for the CH341A to work, but you might have to do that if you’re flashing from Windows.
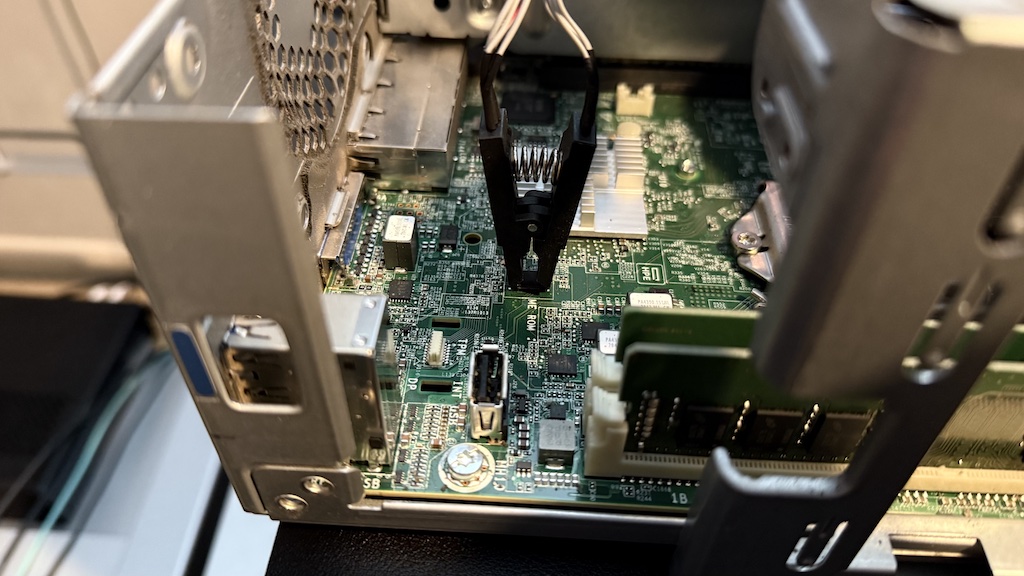
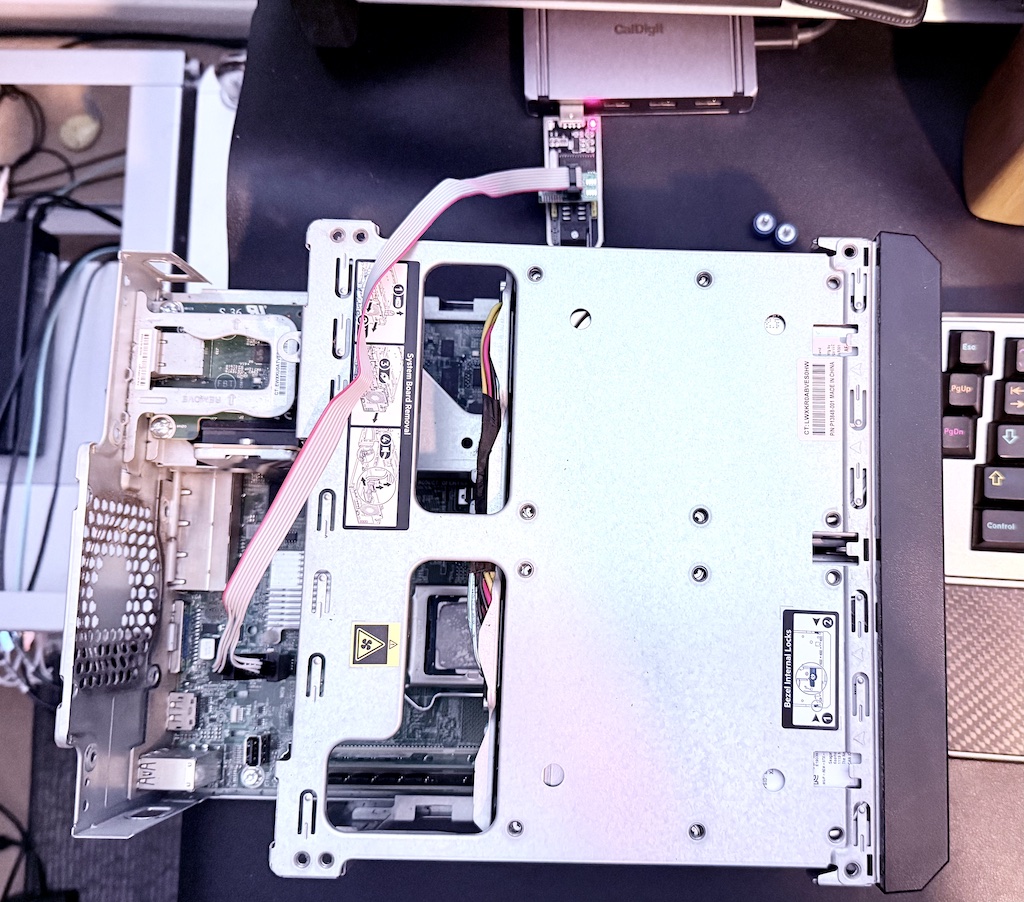
Lastly, here are a few images to show you how to orient the connector cable on the CH341A (pin 1 is important), and where the ME ROM SPI chip is on the mainboard, with clamp attached. Good luck if you need to do any of the above to your own MicroServer Gen10 Plus!

CH341A USB Programmer

Gen10 Plus with SPI flasher attached

HPE Gen10 Plus SPI ROM location